
The summer is coming to a close, and we have been working hard at building enhanced and new features for Factori. Among other things, Factori now features:
- A web interface from any Tezos smart contract (meaning, a very simple dApp) automatically generated in Vuejs, whether you wrote the contract or not;
- DipDup support: you can get DipDup Python handlers from any smart contract;
- Crawlori support: you can generate handlers for our in-house, OCaml-based crawler/indexer Crawlori;
- A lot of behind-the-scenes refactoring, which makes Factori more stable and will allow for exciting new features.
In this tutorial, we will take Claude Barde's famous Rock Paper Scissors contract and showcase what Factori can do with it in a very short time. We will see how to:
- Import contracts and immediately get a free and accessible local web interface for them;
- Re-deploy these contracts to play with them and get an indexer for free;
- Hack together a custom Web-app using these ingredients.
Some of Factori's features may still be a bit rough on the edges, but it's only because it has so many edges! We want you to leave this tutorial realizing how much tedious work you can automate and focus on the fun part of developing smart contracts.
Get the latest version of Factori
Docker
The easiest way to get factori if you are not an OCaml developer is through Docker.
In order to use the docker version of factori, you probably want to use this script: factori.sh
For example, get it with:
$ wget https://gitlab.com/-/snippets/2345857/raw/main/factori.sh -O factoriNote that this script fetches the latest version of factori (through the line IMAGE=registry.gitlab.com/functori/dev/factori:latest). This tutorial was made with factori version 0.3.2; if you have issues, please consider changing that line to IMAGE=registry.gitlab.com/functori/dev/factori:0.3.2.
Then, make it executable with:
$ chmod +x factoriNow, you may use this file as if it were the binary of factori (try factori --help for example, or ./factori --help if the script's directory is not in the $PATH variable).
Build from sources
Although it's not the method we recommend, one can build Factori from the source code available here. But note that this might be tedious, especially for non-OCaml/experienced developers.
Setup
In all that follows, we will be in a working directory (for example, /tmp/factori_tutorial). We also assume that factori script/binary's path is exported in $PATH (for instance, you can move factori to $HOME/bin/ or to /usr/local/bin/).
Import the smart contracts
Pre-deployed versions
If you don't want to go through the hassle of deploying the oracle and rps contracts yourselves, and just skip to the "Web Interface" section, we have pre-deployed versions on Jakartanet at:
- KT1QqSKpDosSV4TMeBVLqY7rPyh7aAqHHVzP (rps), and
- KT1HibZF4YjK2BvceA99gRKUqnG4eLmyq4nR (randomizer).
Manual deploy
First, we will import the oracle and rps contracts into a tutorial_mainnet folder:
$ mkdir <working-dir>/tutorial_mainnet
$ cd tutorial_mainnet
All you need for factori to generate the code you need is to type this command:
$ factori import kt1 . KT1DrZokUnBg35YANi5sQxGfyWgDSAJRfJqY \
    --name rps --web --typescript --network mainnet
(note that --network mainnet is the default option, but it's always good to include it so that we know what we are doing.)
Actually, Claude's contract depends on a randomness generator (more on this later) which we will also need to deploy if we want to play with it on testnet or on a sandbox. Let's import the randomness contract as well:
$ factori import kt1 . KT1UcszCkuL5eMpErhWxpRmuniAecD227Dwp \
    --name oracle --web --typescript  --network mainnet
Install Typescript dependencies. For this, you want to run:
$ make ts-depsGetting working versions of the contracts on Jakartanet
Deploying our own version of Oracle and Rps
Let's write a (short) scenario enabling us to deploy oracle and rps on e.g. flextesa (or ghostnet, or any Tezos blockchain, really).
This scenario will look a lot like the one in our previous article. Put it in src/ts-sdk/src/scenario.ts.
import * as oracle_interface from "./oracle_interface"
import * as rps_interface from "./rps_interface"
import * as functolib from "./functolib"
import {
    TezosToolkit,
  } from "@taquito/taquito"

const config = functolib.jakartanet_config
const tezosKit = new TezosToolkit(config.node_addr)
const debug = false

async function main(tezosKit: TezosToolkit){
    functolib.setSigner(tezosKit, functolib.alice_flextesa.sk);
    let kt1_oracle = await oracle_interface.deploy_oracle(tezosKit,oracle_interface.initial_blockchain_storage,config,debug)
    let rps_storage = rps_interface.initial_blockchain_storage
    rps_storage.randomizer_address = kt1_oracle
    let kt1_rps = await rps_interface.deploy_rps(tezosKit,rps_interface.initial_blockchain_storage,config,debug)
    return;
}

main(tezosKit)
(for an OCaml version, for the curious, there is some code at the end of this post)
- Note that we only took the pain to set the randomizer_address correctly (line 16), for the rest we just used
rps's blockchain storage as is. If we wanted a solid setup, we would carefully choose each element of the storage instead of relying on what's on the blockchain currently.
This scenario deploys the randomizer and rps contracts from Flextesa's Alice address on Jakartanet.
Now you may compile your scenario (make sure you ran make ts-deps before, if you followed instructions, you should be fine):
 $ make ts
 $ node src/ts-sdk/dist/scenario.js
You should get an output looking like
[deploy_oracle_raw] Deploying new oracle smart contract
Waiting for confirmation of origination for <Your Oracle KT1>...
Origination completed.
[deploy_rps_raw] Deploying new rps smart contract
Waiting for confirmation of origination for <Your Rps KT1>...
Origination completed.
Web interface
Now, whether you've decided to use our pre-deployed rps contract or you just deployed yours, we are almost ready to play with the web interface.
Let's switch to a new folder:
$ mkdir <working-dir>/tutorial_jakartanet
$ cd tutorial_jakartanet
For this, we need to re-import the contracts from jakartanet using:
$ factori import kt1 . <your chosen rps kt1> \
    --name my_rps --network jakartanet --web --typescript --crawlori --db-name my_rps_db
(the --crawlori option will be needed later)
Once this is done, you may now run:
$ make ts-deps
$ make web
Open http://localhost:8080/my_rps in your browser, and you will land on a page like this:

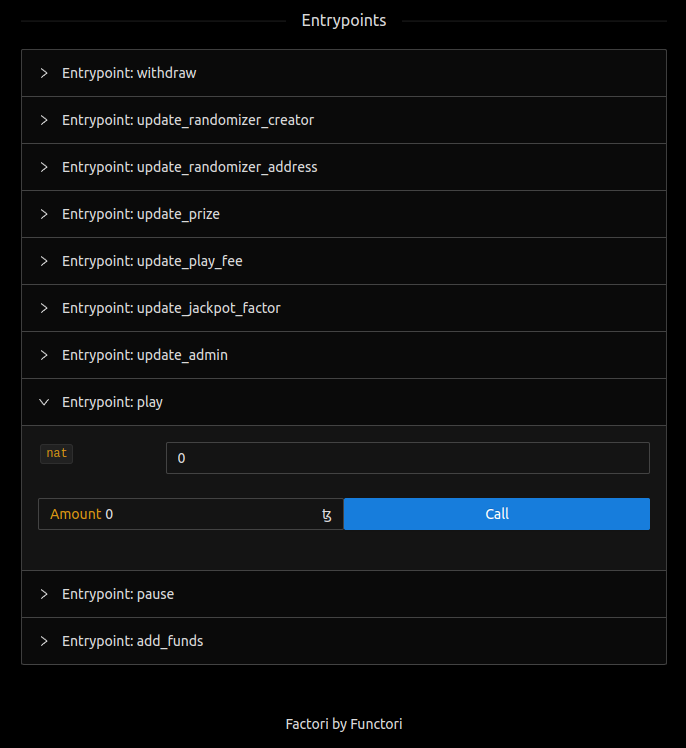
If you click on the my_rps contract, you will see two visual blocks on the page:
- The storage
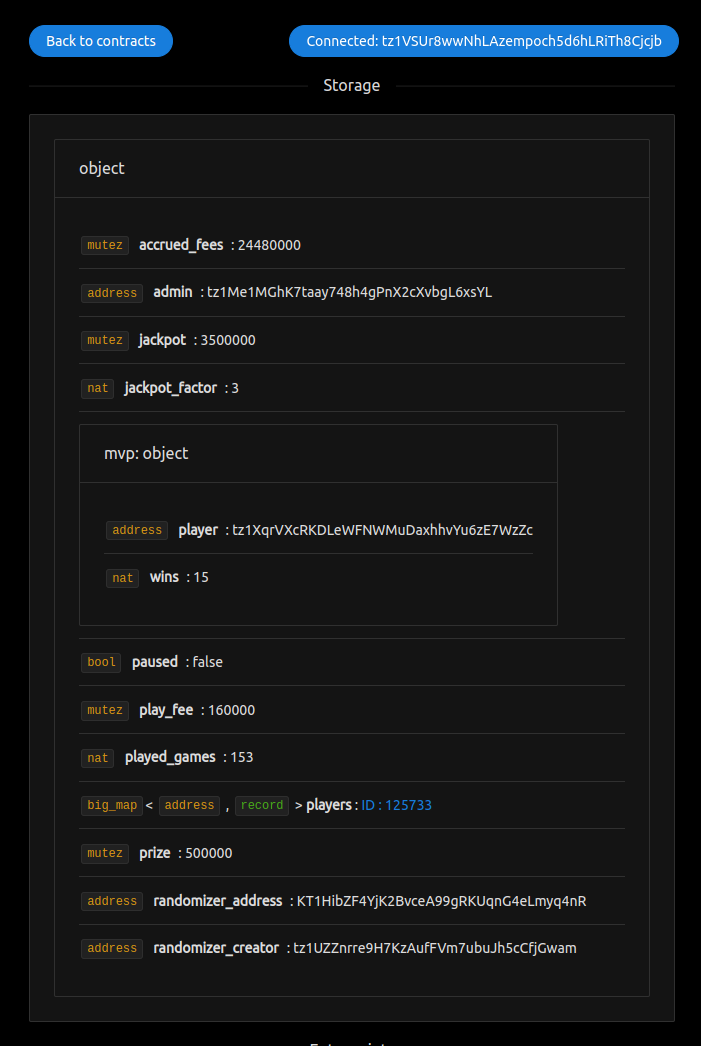
- The entrypoints
Using the beacon tool, you can interact with the contract using your Tezos wallet. Since we are on Jakartanet, you can cheat and use the account for Alice, which you can import into your wallet:
- Alice
- public key : edpkvGfYw3LyB1UcCahKQk4rF2tvbMUk8GFiTuMjL75uGXrpvKXhjn
- address : tz1VSUr8wwNhLAzempoch5d6hLRiTh8Cjcjb
- private key : unencrypted:edsk3QoqBuvdamxouPhin7swCvkQNgq4jP5KZPbwWNnwdZpSpJiEbq
Then, click the "connect wallet" button before interacting with the contract.
Crawling the blockchain
For this section, you will need the opam OCaml package manager, which can be installed following the instructions here. Opam has switches that are contexts local to a directory, with their own set of packages depending on the project. Every project generated with Factori comes with a make _opam instruction in the Makefile, which builds such a switch, and a make deps instruction which installs all needed dependencies.
Now that we have imported our contracts my_rps and my_oracleand that we've visualized them in the web interface, let's crawl the blockchain for events using Crawlori. Remember that we used the option --crawlori when we reimported our contracts. This added a CRAWLORI section to the README, which you can check out. You may have to comment out some parts of your ~/.opam/config file as indicated there, as well as reinstall ez_pgocaml.
Now you may run:
$ make _opam
$ make deps
$ make
Open and edit the file src/ocaml_crawlori/config.json inside the tutorial_jakartanet folder. Replace it with something like:
{ "nodes": [
    "https://jakartanet.ecadinfra.com"
  ],
  "sleep": 1,
  "start": 720509,
  "confirmations_needed": 2,
  "step_forward": 30,
  "register_kinds": [],
  "originator_address" : "tz1VSUr8wwNhLAzempoch5d6hLRiTh8Cjcjb"
 }
You may want to change the start block to the one when your contract was originated (this can easily be found inside the origination operation for example on tzkt.io: for example https://jakartanet.tzkt.io/oouVcDLHcEgSE9fEqPgYcXm4bCy9jMddwzcLLR58VRkZDfcKj9U/209565 says that contract KT1CD2bxUhZjPpnDoCXpaZjrNgcCVoLDNcNy was originated at level, or block, 720509).
As for tz1VSUr8wwNhLAzempoch5d6hLRiTh8Cjcjb, it is the address of Alice, the agent by whom the contract was originated.
Now you should be ready to run:
$ _build/default/src/ocaml_crawlori/crawler.exe src/ocaml_crawlori/config.jsonwhich will start indexing the jakartanet blockchain for operations:
$ _build/default/src/ocaml_crawlori/crawler.exe src/ocaml_crawlori/config.json
Crawler Config: {"originator_address":"tz1VSUr8wwNhLAzempoch5d6hLRiTh8Cjcjb"}
EzPG: database is up-to-date at version 2
Blockchain current level 725659

Last registered level 0

Registering forward from 720509 to 725655

request level 720509
origination KT1CD2bx
request level 720510
request level 720511
request level 720512
request level 720513
request level 720514
request level 720515
request level 720516
request level 720517
request level 720518
request level 720519
request level 720520
request level 720521
request level 720522
request level 720523
request level 720524
request level 720525
request level 720526
request level 720527
This is good, it means that crawlori is crawling the jakartanet blockchain and recording events about our rps contract.
If you play with the play entrypoint, you will notice that your actions are duly recorded by crawlori. Note that the options for playing are 1,2 and 3 corresponding to "Rock", "Scissors" and "Paper" and that by convention, every call to play should have 0.66 tz in the amount field.
Let's slightly modify our factori-generated webapp to print some of these in the next section.
Tweaking the webapp to use Crawlori
Let's get our hands (a bit) dirty and slightly modify our webapp to integrate this record of calls to the play entrypoint.
The code of the webapp for rps can be found in src/ts-sdk/src/components/my_rps.vue. In the spirit of the Vue framework, this file is separated between a HTML part (between <templates> ... </templates> tags) and a typescript part (between <script> ... </script> tags).
Right before the last </template> tag (hence before the first <script> tag),
</a-col>
</a-row>
</a-form-item></a-form>
              </a-collapse-panel>
          </a-collapse>
INSERT YOUR CODE HERE
</template>
<script>
import { TezosToolkit } from '@taquito/taquito'
import * as functolib from '../functolib'
import * as my_rps from '../my_rps_interface'
let's add an html section to print the list of operations:
 <a-divider>Operations</a-divider>
  <a-button type='primary' @click='fetch_operations' block>Fetch operations</a-button>
  <a-list item-layout="horizontal" :data-source="operations">
    <template #renderItem="{ item }">
      <a-list-item>
        <a-list-item-meta :description="item.transaction">
          <template #title>
            Player choice: {{ item.play_parameter.int }} <br />
            {{ item.tsp }}
          </template>
        </a-list-item-meta>
      </a-list-item>
    </template>
  </a-list>
We need to maintain a list of operations, so, in the data section of the script, just after
data: function(){
    return {
        [more code here]
we can add operations: [], so that the code looks like
data: function(){
    return {
      operations: [],
      storage_disabled: false,
        [more code here]
Finally, we're going to fetch our PostgreSQL requests to a local server, so in the methods section, we're going to add:
fetch_operations: async function(){
      const reponse = await fetch('http://localhost:3333/');
      if(reponse.ok)
      {
        const data = await reponse.json();
        console.log(data);
        this.operations = data
      }
    }
alongside the other async functions.
the last thing we need to do is to set up our local server for serving responses to psql requests.
Let's create a folder src/ts-sdk/psql-server where we can write this server in a file psql-server.ts:
$ mkdir src/ts-sdk/psql-serverIn src/ts-sdk/psql-server we're going to create two files:
package.json
{
    "dependencies": {
      "express": "^4.18.1",
      "pg": "^8.8.0"
    },
    "devDependencies": {
      "@types/node": "^18.7.16"
    }
  }
psql-server.ts
In the following file, replace <YOUR PSQL USER> with your username (i.e. in the shell) and <YOUR PSQL HOST> with your PSQL host by running \conninfo inside your psql CLI. The database name should be my_rps_db. (you can get the list of psql databases through auto-completion on the psql command):
import * as express from 'express';
import { Client } from 'pg';

// You might need to edit these variables
let psql_host = "<YOUR PSQL HOST>"  // To edit (e.g.: /tmp or /var/run/postgresql)
let psql_user = "<YOUR PSQL USER>"  // To edit
let psql_database = "my_rps_db"     // Edit if needed
let psql_port = 5432                // Edit if needed
let psql_password = ""              // Edit if needed

class API {
  async test(response){

    const client = new Client({
      "host": psql_host,
      "port": psql_port,
      "user": psql_user,
      "database": psql_database,
      "password": psql_password
    });

    await client.connect();

    const res = await client.query('SELECT * FROM my_rps_play')
    await client.end()

    response.status(200).send(res.rows);
  }
}

const server = express();


var params = {
  server_addr : 'localhost',
  server_port : 3333
}

var apips = new API();

server.use(
  function(req, res, next) {
    res.header("Access-Control-Allow-Origin", "*");
    res.header("Access-Control-Allow-Headers", "Origin, X-Requested-With, Content-Type, Accept");
    next();
  }
);

server.get('/', function(request, response) {
  apips.test(response);
});

server.listen(params.server_port, params.server_addr, () => {
  console.log('API Server listening on ' + params.server_addr + ':' + params.server_port);
});
Now compile and run this file:
$ npm install --prefix=src/ts-sdk/psql-server
$ tsc src/ts-sdk/psql-server/psql-server.ts
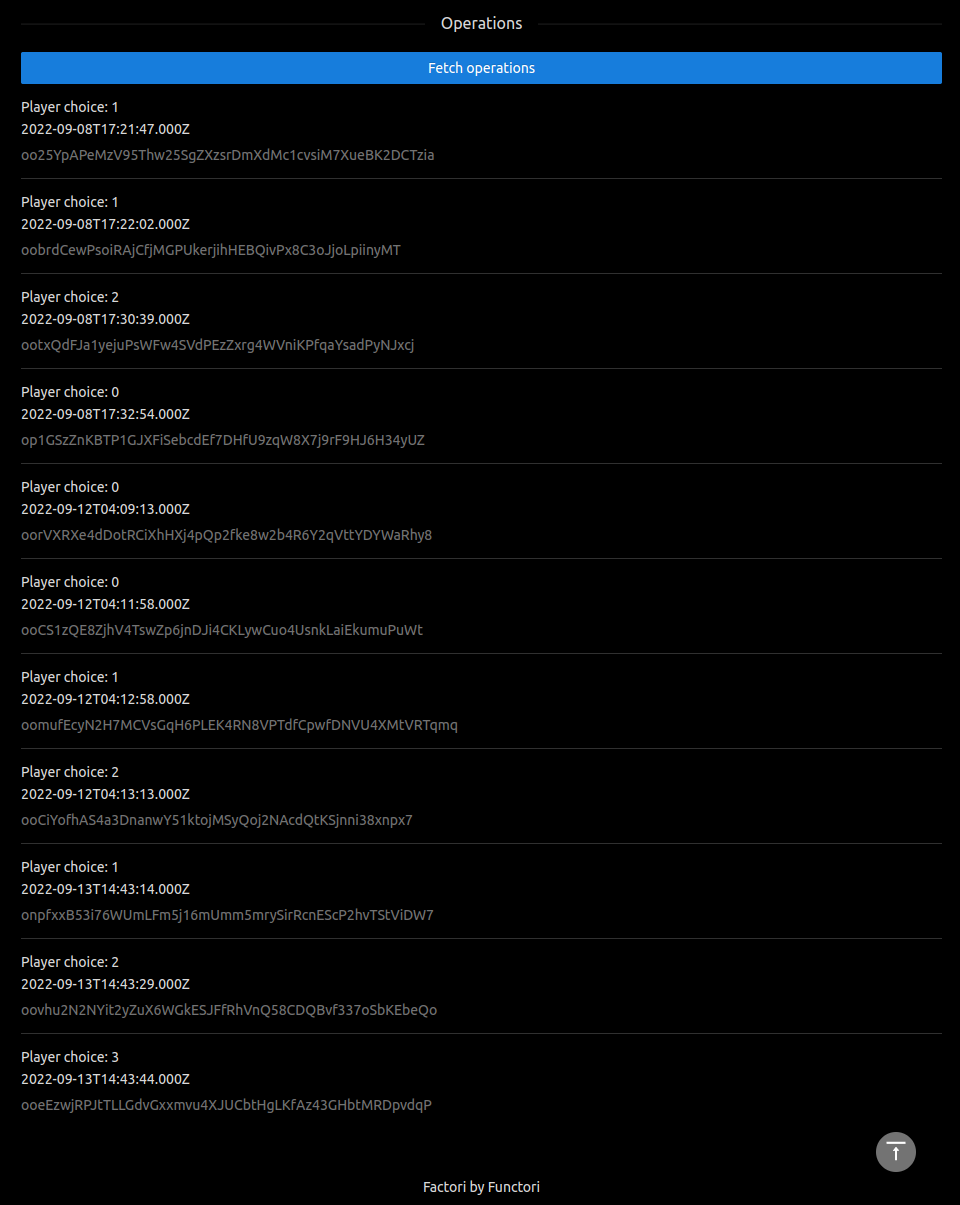
$ node src/ts-sdk/psql-server/psql-server.jsIf you click the "fetch operations" button in your webapp, the list of operations should appear:
Conclusion
After a lot of copying and pasting, let's not lose sight of what we just did.
In seconds, we generated a free webapp for a contract whose code we had never laid eyes on before. Then we generated a free crawler for all operations happening on this contract. Finally, we hacked together a small server to feed crawled information to our webapp, which we demonstrated by listing all entrypoint calls to the entrypoint play.
We hope this tutorial gives you a sense of all the power Factori gives you in smart contract development, testing and shipping. Each generation step of this tutorial used to take developers painstaking time and effort (sometimes in the order of weeks or months of work), including for us right here at Functori. Programming should be fun and all the inevitable boilerplate of smart contract development should be free, automatic and easily editable. We hope we convinced you of that and we're looking forward to feedback to make the whole experience even more fluid!
Footnotes
OCaml version (in src/ocaml_scenarios/scenario.ml)
module Rps =  Rps_ocaml_interface
module Oracle = Oracle_ocaml_interface
module B = Blockchain
open Tzfunc.Rp

let node = B.flextesa_node

let main () =
  let>? kt1_oracle,_ = Oracle.deploy ~node ~from:B.alice_flextesa Oracle.initial_blockchain_storage in
  let storage_rps = {Rps.initial_blockchain_storage with randomizer_address = kt1_oracle} in
  let>? kt1 = Rps_ocaml_interface.deploy ~node ~from:B.alice_flextesa storage_rps in
  Lwt.return_ok kt1

let _ = Lwt_main.run @@ main ()
